Create realistic planet
This is just a fun old post I recovered from the web archive! A tutorial I wrote way back in 2007 on creating realistic planets in Photoshop.
Creating a Realistic Planet using Photoshop Filters
This tutorial has been designed completely by me. The steps are many but the result is great!
Note: Before starting, reset your workspace by Window → Workspace → Reset Palette Locations
Initial Setup
- First of all start with a 750×750 image
- Select the elliptical marquee tool. Set its style to “Fixed Size” and Width and Height to 750, 750 and click to create the selection
- Drag it to the center
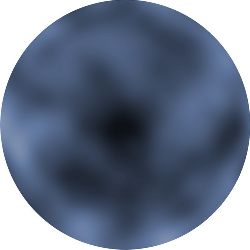
- Create a new layer and name it “Water”
- Goto Filter → Render → Clouds
- Now goto Filter → Distort → Spherize {Amount: 100 — Mode: Normal}
- Lock the layers transparency by clicking on the small checkerboard icon in the layers window
- Filter → Blur → Gaussian Blur {Radius: 20}
- Goto Image → Adjustments → Hue/Saturation {Colorize: Yes — Hue: 218 — Saturation: 25 — Lightness: -20}
Creating the Land
- Now create a new layer and name it “Land”
- Select the layer “Land” and (Ctrl + Click on the water layer)
- Now goto Filter → Distort → Spherize {Amount: 100 — Mode: Normal}
- Image → Brightness/Contrast {Contrast: 100 — Brightness: May range from 0 to -30 according to the size of the land}
- Select the Magic Wand Tool (W) {Tolerance: 32 — Anti-aliased: Yes — Other Options: No}
- Click on any black part of the layer “Land”
- Press delete
- Now Ctrl + Click the “Land” layer
- Goto Filter → Render → Clouds
- Goto Filter → Render → Difference Clouds {Press Ctrl + F until you get a balanced texture, usually 1 time}
- Edit → Fade Difference Clouds {Opacity: 50 — Mode: Normal}
- Press Ctrl + D to deselect the layer
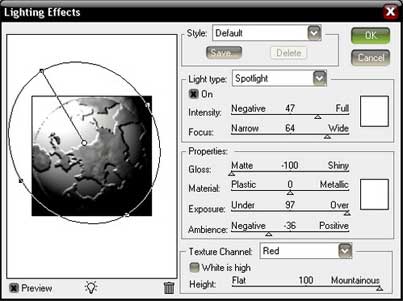
- Goto Filter → Render → Lighting Effects and use these settings
Adding Clouds
- Now create a new layer and name it “Clouds”
- Select the layer “Clouds” and (Ctrl + Click on the water layer)
- Goto Filter → Render → Clouds {Don’t worry if the planet is hidden}
- Goto Filter → Render → Difference Clouds {Once Only!!!}
- Press Ctrl + I
- Image → Adjustments → Brightness/Contrast {Brightness: -30 — Contrast: 95}
- Lock the layers transparency by clicking on the small checkerboard icon in the layers window
- Filter → Blur → Motion Blur {Angle: 0 — Distance: 120}
- Filter → Blur → Gaussian Blur {Radius: 4}
- Now goto Filter → Distort → Spherize {Amount: 50 — Mode: Normal}
- Select its Blending mode as “Screen”
- Image → Brightness/Contrast {Contrast: 60 — Brightness: 0}
- Set the opacity of the layer to 60
- Press Ctrl + D to deselect {IMPORTANT !!!}
- Click on the “Water” Layer
- Goto Filter → Render → Lighting Effects and use the same settings but set the “Texture Channel” to “None”
- Do the same for layer “Clouds”
- Image → Canvas Size {Width: 800 — Height: 800 : Relative: No — Anchor: Center}
- Click on the Background layer
- Press D and then press Alt + Backspace to fill the background
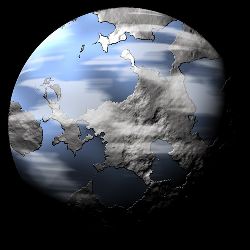
Now your planet should look like this:
Adding Colors and Final Touches
- Click on the layer “Land” and drag it to the New Layer button to duplicate it
- Click on the “Add Layer Mask” button in the layers window
- Filter → Render → Clouds
- Image → Brightness/Contrast {Contrast: 70 — Brightness: 0}
- Now click on the “Land Copy” layer {Click on the thumbnail of the planet!!! not the cloud in the layers window}
- Goto Image → Adjustments → Hue/Saturation {Colorize: Yes — Hue: 139 — Saturation: 25 — Lightness: 0}
- Click on the “Land” layer
- Goto Image → Adjustments → Hue/Saturation {Colorize: Yes — Hue: 35 — Saturation: 40 — Lightness: -30}
- Click on the Background layer
- Filter → Noise → Add Noise {Amount: 70 — Distribution: Uniform — Monochromatic: No}
- Edit → Fade Add Noise → {Opacity: 50 — Mode: Dissolve}
- Filter → Blur → Gaussian Blur {Radius: 1}
- Image → Brightness/Contrast {Contrast: 90 — Brightness: -35}
- Create a new layer just above the background and goto Filter → Render → Clouds
- Select the blending mode to “Screen” and “Opacity” to 50
- Goto Image → Adjustments → Hue/Saturation {Colorize: Yes — Hue: 238 — Saturation: 15 — Lightness: -15}
- Press Ctrl + E
Final Result
Here is the final result:
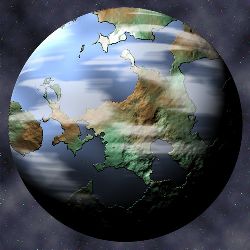
You can make it more realistic by smoothing the land layer with a blur brush tool…
And adding some lighting to the Water layer…
Like this…
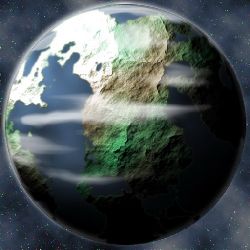
This tutorial demonstrates the power of Photoshop’s rendering and filter tools to create realistic 3D effects. The combination of cloud rendering, spherize distortion, and lighting effects creates a convincing planet surface with atmosphere and depth.