Photoshop Knowledge Required : Medium
Difficulty : Medium
External Plug-ins Required : None
(Before starting Reset your workspace by Window ---> Workspace ---> Reset Palette Locations)
[ Screenshot lost — this step's image was hotlinked to ImageShack and was already a dead link when this page was saved in 2010. ]
This wallpaper is an example of the effect I am trying to achieve through this tutorial.
Okay so here we go...
> Create a New Document (Ctrl + N) with (100 x 100 pixel) size and White background.
> Press D and then press Alt+Backspace, Press X to invert the colors.
> Select the Elliptical Marquee Tool (M) with following settings.

> Align the Circle to the center and press Alt+Backspace to fill it.
[ Screenshot lost — this step's image was hotlinked to ImageShack and was already a dead link when this page was saved in 2010. ]
> Now press Ctrl + A and then go to Edit ---> Define Pattern ( Name : Bump )
> Close the window.
>Now open a new Document (Ctrl + N) with (2000 x 2000 pixel) size and White background.
(You can use any size but make sure it is a multiple of 100 and it square)
> Select the Paint Bucket Tool and use these settings to fill the document.

> Goto the Channels palette.
 and drag the Blue layer to the New Button
 [ Screenshot lost — this step's image was hotlinked to ImageShack and was already a dead link when this page was saved in 2010. ]
> Now Ctrl + Click the "Blue Copy" layer.
> Go to the Layer's Palette
and click on the Background Layer.> Filter ---> Blur ---> Gaussian Blur (3 pixels)
> Press Ctrl + D to deselect.
> Filter ---> Blur ---> Gaussian Blur (1 pixel)
> Double click the Background Layer and press Ok.
> Now click on the New Layer
[ Screenshot lost — this step's image was hotlinked to ImageShack and was already a dead link when this page was saved in 2010. ]
> Fill the layer with Grey color and drag it below the Background Layer.
> Set the blending mode of Background Layer to "Screen" and press Ctrl+Shift+E to merge the layers.
Here is a cropped sample of what your image should look like now.
[ Screenshot lost — this step's image was hotlinked to ImageShack and was already a dead link when this page was saved in 2010. ]
> Now go to Filter ---> Render ---> Lightening Effects and use the settings below
[ Screenshot lost — this step's image was hotlinked to ImageShack and was already a dead link when this page was saved in 2010. ]
> Now go to the Channels Palette and Ctrl + Click the Blue Copy layer again.
> Select ---> Modify ---> Contract (3 px)
> Press Ctrl + M to bring up the Curve Editor and enter the following settings.
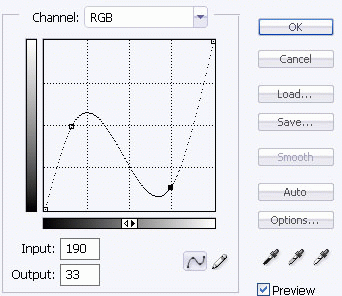
> Now again go to the Channels Palette and Ctrl + Click the Blue Copy layer.
> Go to the layer's Tab and select the layer.
> Image ---> Adjustments ---> Brightness/Contrast ( Brightness : 0 ---- Contrast : 50 )
> Press Ctrl+Shift+I.
> Image ---> Adjustments ---> Brightness/Contrast ( Brightness : 80 ---- Contrast : 0 )
> Press Ctrl+D to deselect.
This should be your image now.
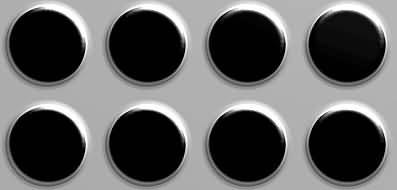
Now you just need to add the perspective effect.
> Edit ---> Transform ---> Perspective
> Now drag the bottom-right and bottom-left points so that your image looks like this.
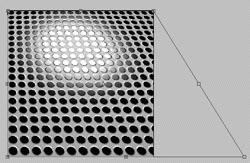
This should be your final result after some Hue Changes.
[ Screenshot lost — this step's image was hotlinked to ImageShack and was already a dead link when this page was saved in 2010. ]
Hope you like this tutorial.
Comments are appreciated.